

What is Sciatica?
Sciatica refers to the pain that affects your lower back and hip and starts radiating along the sciatic nerve (through buttocks) down one or both legs. The sciatic nerve is the longest in the human body that originates from the base of the spine, running along the back of each leg and into the foot.
Generally, it affects only one side of the body. However, it can also occur in both legs. It is just a matter of pinched nerve along the spine. There are various exercises for sciatica with which you can relieve the pain.
The pain associated with it most commonly occurs when a herniated disc compresses part of the nerve, causing pain, inflammation, and sometimes numbness in the affected leg.
Actual injury to the sciatic nerve is rare, but the pinched nerve frequently creates pain. It can be severe, although most cases resolve by themselves (non-operative treatments) in a few weeks.
Sciatica Pain Symptoms
Common symptoms experienced by people are:
1) Pain: Many have described the pain as sharp and shooting, and others have described this as an intense burning or electric sensation.
2) Numbness: Sometimes, pain is also accompanied by numbness that could feel like pins and needles in the back of your leg or foot.
3) Posture-related symptoms: Pain, numbness, and other symptoms may get worse while sitting, trying to stand up from a seated position, lying down, bending the spine forward or twisting it sideways, or coughing.
Common causes of Sciatica include:
- Herniated or slipped disc
- Injury to the sciatic nerve
- Narrowing of the spine (spinal stenosis)
Sometimes, this pain can also be caused by a condition called piriformis syndrome. Piriformis is a muscle that starts from the edge of your spine to the top of your thigh. When this muscle starts to spasm, it traps the sciatic nerve leading to discomfort and pain.
Yoga Poses For Sciatica
- Knee to shoulder
- Sitting Spinal Stretch
- Balasana (Child’s Pose)
- Bridge Pose (Setu Bandha Sarvangasana)
- Cobra Pose (Bhujangasana)
A note before doing these exercises:
Do with proper care. Don’t just watch a video on Youtube or look up exercises and start doing them right away.
Stop immediately if any of these exercises give you any pain or irritation. When you first start doing your exercises, you might not be as flexible as other people. So, make sure to stretch according to your comfort and convenience.
1) Knee to Shoulder:

This one is a simple and essential exercise to loosen your muscles located near your piriformis and glutes. You can start with this exercise to relieve some discomfort.
Steps:
1) Lie down on your back with your legs extended forward and your toes upward.
2) Using your hands, bend your left leg.
3) Gently pull that leg to your left shoulder and hold that position for 15-30 seconds. Remember to pull your knee at your convenience. You will feel a stretch if you do so.
3) Slowly place your left leg at its initial position and carry on the same process with your right leg. Bend your right leg and pull it towards your right shoulder.
4) Repeat it as long as you want until you feel ready for the next exercise.
2) Sitting Spinal Stretch

There are several causes to trigger your sciatica pain. If one of those is compression of your vertebrae, this exercise will help create space in the spine to relieve the pressure off the sciatic nerve.
Steps:
1) Sit on the ground with your legs extended forward and with your toes flexed upward.
2) Bend your right knee and place it onto the side of your opposite leg. The foot should be placed flat.
3) Place or hold your left elbow against the outside of your right knee to gently turn your body towards the right.
4) Hold this position for 30 seconds and then switch sides.
3) Balasana (Child’s Pose)
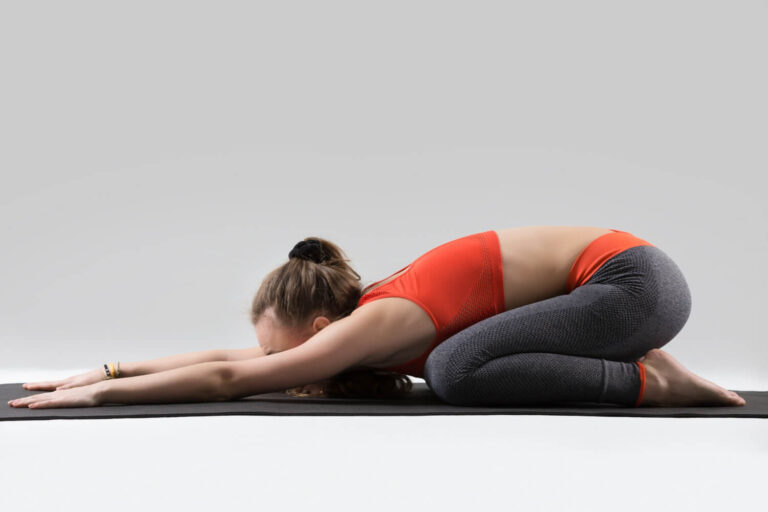
A child’s pose is the most basic and important resting yoga posture that strengthens various parts of the body. It stretches your back, hips, thighs, and ankles. It can be done before starting your yoga routine or can also be done in between advanced poses.
Steps:
1) Start with a seated cross-legged position. Get on all fours, on your hands and knees.
2) Slowly kneel on the floor with folded knees (hip-width apart) and feet behind your buttocks with the big toes touching each other.
3) After doing so, bend down forward and place both arms in front of your head and alongside your torso.
4) Make sure that your forehead is slightly touching the ground.
5) Breathe in and out gently and hold the position for 30 seconds to 1 minute.
4) Bridge Pose (Setu Bandha Sarvangasana)

Bridge Pose is one of the first backbend postures which strengthens your legs and hips, massages the spine, and opens the heart. Doing this pose helps calms the mind and energizes the body to help you feel restored and refreshed.
Steps:
1) Lie down on your back with your knees bent, legs, and feet parallel with the hip distance apart.
2) Move both legs closer to your buttocks and press down firmly, using your feet to raise your hips.
3) Make sure to lift your abdomen with the help of your pelvis rather than the navel.
4) Simply place your hands onto the ground or clasp them and hold this position for 30 seconds as you inhale and exhale gently.
5) Bring your hips down on the floor as you slowly exhale, and repeat this exercise 5-10 times.
5) Cobra Pose (Bhujangasana)
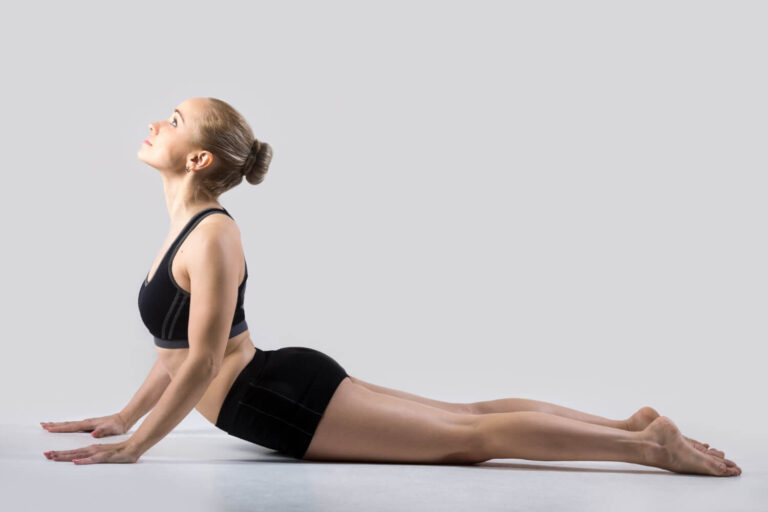
This pose is also a back-bending posture that has been a part of the Surya Namaskar (Yogic exercise) sequence as step 8 and step 20. This pose plays a major role in soothing sciatica. It also strengthens your back and glute muscles and stretches your chest, shoulders, and abdomen.
Steps:
1) Lie down on the floor on your belly. Straighten out your legs and toes outward.
2) Place your palms on the floor under your shoulders, alongside your chest.
3) As you inhale, start lifting your head, chest, and shoulders.
4) Ensure that there is a slight bend at your elbows.
5) Engage the muscles in your lower back, buttocks, and thighs.
6) Hold this pose for up to 30 seconds.
7) Return to your original position, rest, and repeat 3-5 times.
Related blog: Importance of Self-Discipline